A Simple Guide to Making Great Coffee
People always want to know the secret to a great cup of coffee. The truth is, there isn't just one secret. Making good coffee is a process.
It's really about getting four main things right. Think of it as a system built on a little science and a lot of care. Here are the four pillars to focus on.
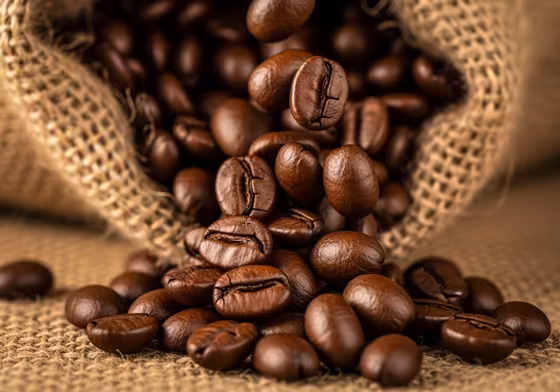
- Pillar 1: The Bean. Your coffee journey starts with the beans. Good quality, fresh beans are the most important part of the whole process.
- Pillar 2: The Water. Your brewed coffee is about 98.5% water. So, the quality and temperature of your water really matter for the final taste.
- Pillar 3: The Ratio. The amount of coffee you use compared to the amount of water is key. This ratio controls the coffee's strength and flavor.
- Pillar 4: The Method. There is no one-size-fits-all coffee grind. The grind size needs to match your brewing method and brew time to get the flavor just right.
This guide is all about helping you master these four things. After all, "perfect" coffee is about what you taste, smell, and even how it feels in your mouth. Learning how to make great coffee is just learning how to control these four steps.
The Most Important Things to Know First
Before you even pick a coffee maker, two things determine how good your coffee can be. These are the quality of your beans and the quality of your water. If you get these wrong, no expensive machine can fix it.
Why Good Beans Matter Most
There's a simple rule for coffee called the 80/20 rule . It means that 80% of your coffee's final flavor comes from the bean itself. Only 20% depends on how you brew it.
That 80% includes where the bean was grown, how it was processed, and how it was roasted. The other 20%, which is your brewing method, water temperature, and grind size, can only bring out the potential that's already in the bean. It can't create flavor that isn't there.
Here's the thing: a $30 coffee maker with fresh, high-quality beans will make better coffee than a $2,000 machine with old, stale beans. You can't make up for bad beans with good equipment. So, the most important step is always to start with good beans from a good roaster.
How Freshness Affects Your Coffee
The 80/20 rule shows that bean quality is key. Another rule, called the "15 Rule," shows how quickly that quality disappears. Freshness is not a nice-to-have, it's a must-have .
This rule of thumb shows how fast coffee goes stale:
- 15 Months: Green, unroasted coffee beans stay fresh for about 15 months.
- 15 Days: Once roasted, whole beans lose most of their flavor and go stale after about 15 days.
- 15 Minutes: After coffee is ground, it's exposed to much more oxygen. This makes it go stale in just 15 minutes.
This 15-minute rule is the best reason to own a grinder and grind your beans right before you brew. That amazing smell when you open a bag of pre-ground coffee is the smell of its best flavors escaping forever. Buying pre-ground coffee means you've already lost most of the bean's potential.
Getting Your Water Right
The last core principle is water. Since brewed coffee is 98.5% water, its quality is super important but often forgotten. Always start with clean, filtered water.
But a common mistake is using water that is too pure. Never use distilled or reverse-osmosis water. The process of pulling flavor from coffee grounds needs minerals like magnesium and calcium in the water.
Without these minerals, the water can't grab onto the flavor compounds. This leaves you with a flat and lifeless cup. For home use, a simple charcoal filter is great because it removes bad tastes like chlorine but leaves the good minerals.
Using the Right Ratios
Once you have good beans and water, the next step is being precise. The coffee-to-water ratio is the blueprint for your final cup. It controls both flavor and strength.

The Standard 1:18 Ratio
The "Golden Ratio" is the coffee industry's starting point for a balanced cup. This standard from the Specialty Coffee Association (SCA) is a ratio of 1:18.
This means you use 1 part coffee to 18 parts water by weight. For example, that would be 55 grams of coffee for 1000 grams (1 liter) of water. This is the standard used by pros to get the ideal flavor extraction.
Finding the Right Ratio for You
While 1:18 is the scientific standard, flavor is personal. Many people find the 1:18 ratio a little too light. They prefer a coffee with more body and strength.
For this reason, a good starting range for most home brewing is 1:15 to 1:17 . A ratio of 1:17 is a great place to start for a strong, balanced cup.
You'll also need to adjust the ratio based on your brewing method. Different methods pull flavor out of the coffee in different ways.
- Pour-Over & Auto-Drip: Start at 1:17. Try 1:16 for a stronger cup or 1:18 for a lighter one.
- French Press: This method needs more coffee. A good range is from 1:12 to 1:15.
- AeroPress: Ratios can vary a lot, but 1:14 is a common starting point for a full-bodied cup. You can also use 1:4 to make a strong concentrate.
- Moka Pot: This method is meant to be strong and usually uses a 1:7 ratio.
Why You Should Use a Scale
The biggest reason people can't make a perfect cup every time is using measurements like tablespoons or scoops. The real secret to consistency is using a digital kitchen scale.
Measuring by volume doesn't work well for a couple of reasons.
- Density Varies: Coffee beans have different densities depending on the roast level and where they're from. A tablespoon of a dense, light-roast coffee weighs more than a tablespoon of a fluffy, dark-roast coffee.
- Scoops are Inconsistent: A "level" scoop and a "heaped" scoop can have a huge difference in the amount of coffee. The variation can be as much as 30-50%.
A scale takes all the guesswork out of it. 20 grams of coffee is always 20 grams of coffee.
What to Do Without a Scale
Even though a scale is better, sometimes you just need to use a tablespoon. You can find all sorts of recommendations, which proves how inconsistent it is.
If you have to use a volume measurement, the most common guideline is this:
Use 2 level tablespoons of ground coffee for every 6 ounces of water.
Also, remember that a "cup" on a standard coffee pot is usually 5 or 6 ounces, not 8 ounces.
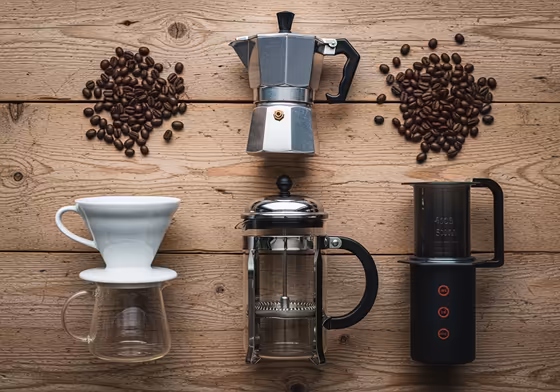
Choosing a Coffee Maker
Once you have the basics down, it's time to pick your brewing method. There is no single "best" method. The right choice is a personal one, based on what you like.
- Body: Do you like a heavy, rich feel (French Press) or a light, clean one (Pour-Over)?
- Clarity: Do you prefer a blend of flavors (French Press) or a cup that lets you taste specific notes (Pour-Over)?
- Convenience: Do you want to set it and forget it (Auto-Drip) or do you enjoy a hands-on process (Pour-Over)?
- Volume: Are you making a big pot or just a single cup?
Using an Automatic Drip Machine
The automatic drip machine is the most common way to make coffee at home. But it often makes a dull, watery cup. This is usually because cheaper machines don't meet the basic needs for good coffee.
- Low Temperature: They don't get the water hot enough, which should be between 195-205 degrees F.
- Poor Saturation: They just sprinkle water in the middle of the grounds. This doesn't wet all the coffee evenly, leading to a weak brew.
But you can still make great coffee with a machine if you follow these steps:
- Use a Certified Machine: Look for an "SCA Certified Home Brewer." These machines are tested to make sure they get the water temperature and brew time right.
- Use a Thermal Carafe: Don't use a glass pot on a hot plate. The hot plate keeps cooking the coffee, which makes it taste burnt and bitter.
- Follow the Core Principles: Use a scale to measure your beans, use filtered water, and grind your beans right before brewing.
- Clean Your Machine: Old coffee oils build up and go bad, which can make new brews taste bitter. Clean and descale your machine regularly.
Manual Brewing Methods
Manual methods give you a lot more control over the brewing process. This usually means you get a better cup of coffee.
-
The French Press (Full Immersion)
- Profile: Makes a rustic, strong, and full-bodied coffee.
- Pros: It's cheap, easy to use, and great for beginners. It's also good for making larger batches.
- Cons: It leaves a lot of fine sediment in the cup, which can make the flavor a bit muddy. The mesh screen is also hard to clean properly.
-
The Pour-Over (Percolation) (e.g., Hario V60, Chemex)
- Profile: Makes an exceptionally clean, crisp, and vibrant cup.
- Pros: This is the best method for bringing out the delicate and complex flavors of a high-end coffee bean.
- Cons: It requires the most skill. You'll need a gooseneck kettle for a controlled pour. It's a slow process and not great for making coffee for a group.
-
The AeroPress (Pressure & Immersion)
- Profile: Makes a dark, smooth, rich coffee with very little bitterness. It's often described as being like espresso.
- Pros: It's incredibly fast (about a 2-minute brew time), very durable, and portable. It's also the easiest method to clean and lets you try out many different recipes.
- Cons: It only makes a single, smaller cup of coffee. It also needs its own special paper filters.
-
The Moka Pot (Stovetop "Espresso")
- Profile: Makes a very strong, thick, and robust coffee that's similar to espresso. It often has a slightly burnt flavor.
- Pros: It's an affordable way to make espresso-like coffee. It makes a powerful coffee base that's perfect for milk drinks.
- Cons: It doesn't have the clear flavors of true espresso. If you don't clean it well, it can get gross inside.
Comparing Brewing Methods
| Brewing Method | Type | Grind Size | Typical Ratio (Coffee:Water) | Brew Time | Flavor Profile |
|---|---|---|---|---|---|
| French Press | Full Immersion | Coarse | 1:12 - 1:15 | 4–6 minutes | Full-bodied, rustic, rich |
| Pour-Over (V60) | Percolation | Medium | 1:16 - 1:17 | 3–5 minutes | Clean, bright, clear, delicate |
| AeroPress | Immersion / Pressure | Medium-Fine | 1:14 (or 1:4 for concentrate) | 2–3 minutes | Smooth, rich, espresso-like |
| Moka Pot | Stovetop Pressure | Fine | 1:7 | ~5 minutes | Strong, robust, espresso-like |
| Auto-Drip | Percolation | Medium | 1:17 - 1:18 | 5–8 minutes | Classic, balanced (good machine) or thin, dull (bad machine) |
A Quick Note on Espresso Machines
It can be tempting to try making espresso at home, but experts say beginners should avoid it. It's an expensive and frustrating hobby that takes a lot of time and practice. The equipment is also expensive and can be delicate.
If you want a strong, espresso-like coffee, master the Moka Pot or AeroPress first. You'll get a similar result without all the frustration.
Tips for Better Brewing
Picking a coffee maker is only half the battle. That "20%" of the brewing process is where a good bean can become a perfect cup, or be totally ruined. This requires mastering a few key techniques.
Why You Need a Burr Grinder
As the 15-minute rule showed, a grinder is essential. But the type of grinder you use is just as important.
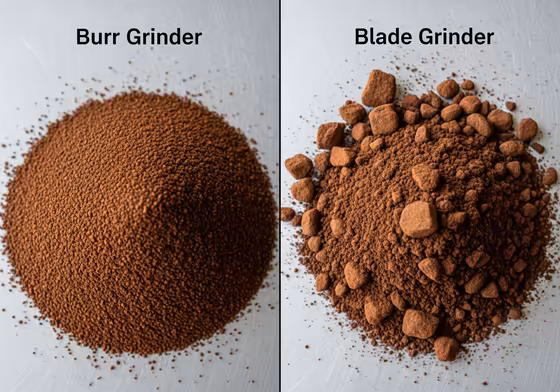
- Blade Grinders: These cheap grinders use a spinning blade to chop beans. This creates an inconsistent mix of fine dust and large chunks. The dust will make the coffee bitter, while the chunks will make it sour.
- Burr Grinders: These use two abrasive surfaces to crush the beans to a very specific and uniform size. This consistency is the key to getting a balanced and even flavor.
As a general rule, the grind size should match the brew time.
- Coarse Grind: Use for long brew times, like a French Press (4+ minutes).
- Medium Grind: Use for medium brew times, like a Pour-Over (3-5 minutes).
- Fine Grind: Use for short brew times, like a Moka Pot or AeroPress (1-2 minutes).
The Best Water Temperature
The ideal water temperature for brewing coffee is between 195 and 205 degrees F . This is the sweet spot for pulling out the best flavors.
- Too Cold (below 195°F): The water won't be able to dissolve the good flavors like sugars and oils. This leads to a sour, weak, and under-extracted cup.
- Too Hot (above 205°F): The water will scorch the grounds and pull out too many compounds, including the unpleasant bitter ones. This makes the coffee taste bitter and burnt.
Here's a pro tip. If you don't have a kettle with temperature control, just bring your water to a boil and then let it sit for 30 to 60 seconds. This will bring the temperature down to the perfect range.
Why You Should 'Bloom' Your Coffee
For any manual brewing method using fresh coffee, the "bloom" is one of the most important steps.

- What It Is: When hot water first hits fresh coffee grounds, you'll see them swell up and bubble. This is the bloom.
- Why It Matters: Those bubbles are trapped carbon dioxide (CO2) being released from the beans. CO2 actually pushes water away. If you skip the bloom and pour all your water at once, the escaping gas prevents the grounds from getting evenly wet, which leads to a weak brew.
-
How to Do It:
- Place your grounds in the filter.
- Pour just enough hot water to get all the grounds wet (about twice the weight of the coffee).
- Gently stir or swirl to make sure there are no dry spots.
- Wait 30 to 45 seconds for the bubbling to stop.
- After the pause, continue with the rest of your pour.
How to Make Strong Coffee (Not Bitter Coffee)
A lot of people want a "really strong" cup of coffee. But it's important to know that "strong" is not the same thing as "bitter."
- "Strong" refers to the coffee's body and richness. It's the concentration of good flavors.
- "Bitter" is a bad flavor that happens when you over-extract the coffee. This means you've pulled out the harsh, woody compounds from the grounds.
How to Get Strength (The Right Way):
- Adjust Your Ratio: This is the easiest way. Use less water for the same amount of coffee. For example, move from a 1:17 ratio to a 1:16 or 1:15 ratio.
- Choose the Right Method: Methods like French Press, Moka Pot, or AeroPress naturally make a cup with a heavier body and stronger profile.
How Not to Get Strength (The Wrong Way):
- Don't Just Grind Finer: Using a grind that's too fine for your brewer will clog the filter and lead to a bitter, choked cup. It won't make it "strong" in a good way.
- Don't Just Brew Longer: Letting a French Press steep for 10 minutes instead of 4 will just make it intensely bitter. It over-extracts all the bad flavors from the grounds.
Making Coffee with Milk
To make a great cup of coffee with milk, you have to think a little differently. A standard cup of drip coffee will taste weak and watery once you add a lot of frothed milk.

You Need Strong Coffee for Milk Drinks
Drinks like lattes and cappuccinos aren't made with regular coffee. They are made with espresso. The milk is meant to go with a strong, concentrated coffee base.
If you don't have an espresso machine, your goal is to make a similar coffee concentrate.
-
Best Methods for a Milk Base:
- Moka Pot: This is the best choice. It's designed to make a strong, espresso-like shot that is the perfect base for milk.
- AeroPress: This is the next best option. Using a tight ratio (like 1:4) brews a very strong shot that holds up well against milk.
Choosing the Best Milk
The quality of your foam and the final taste all come down to the milk. For any milk, the technique is the same. Start with cold milk and a cold pitcher, and heat it only to 140-150 degrees F.
-
The Dairy Gold Standard: Whole Milk
Whole milk is what baristas prefer. It has the perfect balance of fat for a rich feel, protein for good foam, and sugar for sweetness. This creates a velvety microfoam that's great for latte art.- 2% Milk: A lighter option, but the foam can be inconsistent.
- Skim Milk: You lose all the creaminess.
-
The Non-Dairy Champions: Look for "Barista Edition"
For non-dairy milk, you need to find a "Barista Edition" or "Barista Blend." Regular versions are often watery, foam poorly, and can curdle in hot coffee. Barista blends have added fats and emulsifiers to help them steam like whole milk.- The Winner: Oat Milk (Barista Edition): This is the star of plant-based milks. It steams almost exactly like real milk and creates great latte art. It's creamy, sweet, and doesn't curdle.
- The Runner-Up: Almond Milk (Barista Edition): Special barista blends foam well and resist curdling. Regular almond milk is not a good choice.
- The Old Stand-By: Soy Milk: Soy has a lot of protein, so it foams very well. However, its "beany" flavor can be strong, and it curdles easily if you're not careful.
Comparing Different Milks
| Milk Type | Flavor Profile | Steaming & Foam Quality (1–5) | Latte Art Potential | Curdle Risk? |
|---|---|---|---|---|
| Whole Milk | Rich, creamy, sweet | 5/5 | Excellent | No |
| 2% Milk | Lighter, less sweet | 3/5 | Fair | No |
| Oatly (Barista Edition) | Creamy, naturally sweet | 5/5 | Excellent | No |
| Califa (Barista Almond) | Nutty, sweet | 4/5 | Good | Low |
| Regular Almond Milk | Thin, watery, nutty | 1/5 | Poor | High |
| Soy Milk (Bonsoy) | Neutral-to-beany | 4/5 | Good | High |
| Pea Milk | Neutral, milk-like | 4/5 | Good | Low |
Making a Single Cup of Coffee
When you're just brewing for yourself, things are a bit different. Using a big 12-cup coffee maker to brew a single cup is a bad idea. The small pile of grounds won't brew evenly, and you'll end up with a weak, watery cup.
For one person, manual methods are always better. They give you a higher quality cup and are more efficient.
The Best Ways to Make One Cup
When you ask coffee lovers the best way to make a single cup, three methods always come up.
- The Pour-Over (Hario V60): The classic choice for someone who wants a very clean cup.
- The AeroPress: The practical choice, loved for its speed, consistency, and great flavor.
- The Moka Pot (small version): The strong choice, perfect for an espresso-like coffee.
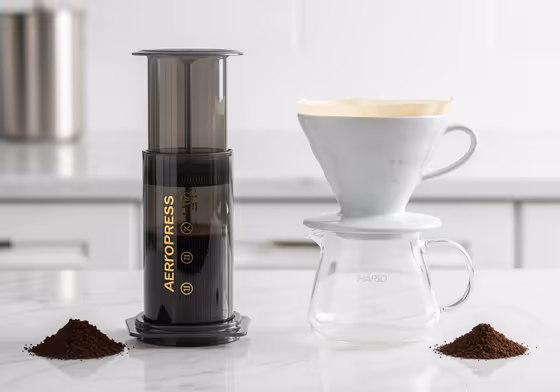
AeroPress vs. Pour-Over
For people who want the perfect single cup of black coffee, the choice often comes down to the AeroPress versus a pour-over like the V60. The best one for you depends on your "coffee personality."
-
AeroPress (The Practical Choice)
- Flavor: It makes a more intense, full-bodied, and robust cup. Many people say it has a perfect flavor.
- Process: It's faster (2-3 minutes), easier to use, and much more consistent. You don't need a special kettle or even a scale to get a great cup, and it's the easiest brewer to clean.
-
V60 / Pour-Over (The Purist's Choice)
- Flavor: It makes a smoother, more vibrant, and cleaner tasting cup. It's the best way to taste the bright and delicate notes of a single-origin bean.
- Process: It takes longer (3-5 minutes) and requires more skill. To get good results every time, a gooseneck kettle and a scale are pretty much essential. For many, the hands-on ritual is part of the appeal.
So here's the bottom line. Choose the AeroPress if you want consistency, speed, and intense flavor with very little effort. Choose the V60 if you care more about flavor clarity and you enjoy the craft and ritual of brewing.
Coffee Myths and Trends
The coffee world is full of strange terms and fads. While some are important, like the freshness rule, others are just social media trends.
What Is the "Coffee Loophole" Trend?
You might have heard about a "3-ingredient coffee trick" online. This is a viral trend, also called the "coffee loophole," that's promoted for weight loss, not for better tasting coffee.
- What It Is: The claim is that adding certain ingredients to your coffee will boost your metabolism and help you burn fat.
-
The Ingredients:
The most common version of the trick involves adding three things to your coffee.
- Cinnamon
- Coconut Oil (or MCT oil)
- Collagen Peptides
- Variations: Other versions suggest adding lemon juice and honey instead of coconut oil.
-
The Verdict (Fact vs. Fiction)
- The "Fact": Each ingredient does have very minor, temporary effects. Caffeine can slightly boost your metabolism for a short time. And the fat in coconut oil is processed by the body a bit differently.
- The "Fiction": This is not a magic weight-loss trick. It will not "burn your fat without exercise." The boost from caffeine is tiny, and you would need to drink a dangerous amount of coffee for it to have any real effect.
This is a health trend, not a coffee technique. If your goal is the perfect cup of coffee, adding oil and cinnamon will only hide the delicate flavors you worked so hard to brew.